Are you dreaming of a cozy outdoor space to relax and entertain? A ground-level wooden deck might be just what you need. Many homeowners want to expand their living area but don’t know how to build a ground-level deck.
Don’t worry, we’ve got you covered.
Did you know that ground-level decks, also called floating decks, sit less than 30 inches above the ground? This makes them safer and often cheaper to build than raised decks. In this guide, we’ll walk you through the steps to design and install your own ground-level wooden deck.
From planning and choosing materials to building the frame and laying the boards, we’ll cover it all. Ready to transform your backyard?
Key Takeaways
- Ground-level wooden decks sit less than 30 inches above the ground, making them safer and often cheaper to build than raised decks.
- Planning is crucial: measure your space, check local building codes, and assess the site for potential issues like roots or pipes before starting.
- Choose the right wood for your climate and budget, such as pressure-treated pine, cedar, or composite materials, and use proper fasteners and protective coatings.
- Prepare a solid foundation by leveling the ground and installing concrete blocks or footings, then build a sturdy frame with beams and joists spaced 16 inches apart for wood decking.
- Finish your deck by properly spacing and fastening boards, adding steps if needed, and applying weatherproofing treatments to protect the wood from moisture and sun damage.
Planning Your Ground-Level Wooden Deck
Planning a ground-level wooden deck starts with careful thought. You’ll need to measure your space and check local rules before you start.
Assess the site and dimensions
Start your deck project by checking out your yard. Look at the land, how water flows, and where the sun hits. Measure the space you want for your deck. Make sure it’s at least 4 feet from property lines.
Think about how you’ll use the deck and how many people might be on it. This will help you figure out the right size.
Don’t forget to look at what’s under the ground too. Check for roots, rocks, or pipes that could cause problems. Also, think about how close the deck will be to your house. You want good airflow to prevent rot.
Taking time to plan now will save you headaches later when you start building your ground-level wooden deck.
Check local building codes
After assessing your site, it’s time to focus on the regulations. Local building codes are essential for your deck project. They ensure safety and protect your property. In Colorado, these codes can differ by city or county.
Most areas require permits for decks over 30 inches high. Some may need them for lower decks too. It’s advisable to check with your local building department before starting.
Safety is crucial for decks. Codes often require guards or railings on higher decks. They also establish rules for footing depth. This is particularly important in Colorado’s freeze-thaw climate.
Remember to call 811 before digging. This free service marks underground utilities for safety. Adhering to codes may seem challenging, but it’s beneficial. It can prevent costly issues and complications in the future.
Choosing the Right Materials
Picking the right materials can make or break your deck project. Wood types, fasteners, and protective coatings all play key roles in your deck’s durability and looks.
Types of wood
Choosing the right wood for your deck is crucial. Here are some popular options for deck building in Colorado:
- Pressure-treated pine: This affordable wood resists rot and insects. It needs regular sealing to maintain its look and strength.
- Cedar: A natural beauty that resists decay and repels bugs. It’s lighter than other woods but may need more upkeep.
- Redwood: Known for its rich color and natural resistance to decay. It’s pricey but can last for decades with proper care.
- Composite: Made from wood fibers and plastic, it’s low-maintenance and durable. It costs more upfront but needs less care over time.
- Ipe: This tropical hardwood is extremely dense and durable. It’s costly but can last up to 50 years with minimal care.
- Modified wood: Treated to enhance durability and resist warping. It’s eco-friendly and requires little maintenance.
- Oak: A strong, dense wood that’s resistant to wear. It needs regular sealing to prevent moisture damage.
- Teak: Prized for its natural oils that resist decay and insects. It’s expensive but can last a lifetime with proper care.
Decking fasteners and protective coatings
Decking fasteners and protective coatings play a key role in building a sturdy, long-lasting deck. Let’s explore the options that will help you create a solid and attractive outdoor space.
- Deck screws offer strong connections and come in corrosion-resistant types for lasting durability.
- Hidden fasteners give a clean look by securing boards without visible screws on the surface.
- Stainless steel or coated screws resist rust and work well in Colorado’s varied climate.
- Joist tape, like TimberTech Pro-Tac, shields framing from water damage and extends deck life.
- Protective coatings guard wood against sun, rain, and snow, keeping your deck looking fresh.
- Water-repellent sealers block moisture and prevent warping or cracking of deck boards.
- UV-resistant finishes maintain wood color and prevent fading from strong Colorado sunlight.
- Anti-slip coatings improve safety on deck surfaces, especially in wet or icy conditions.
- Deck stains enhance wood grain while adding a layer of protection against the elements.
- Regular reapplication of protective coatings keeps your deck in top shape year after year.
Design and Installation of Your Ground-Level Wooden Deck
Designing your ground-level wooden deck starts with a clear plan. Sketch out your ideas, noting the deck’s shape, size, and any special features. Think about how you’ll use the space and where you’ll place furniture.
For installation, start by prepping the ground. Level the area and lay a weed barrier to stop plant growth. Next, set up a frame using pressure-treated lumber. This frame forms the base of your deck.
Space the joists evenly to support the decking boards. Finally, lay your chosen decking material, leaving small gaps between boards for water drainage. With careful planning and step-by-step work, you can create a beautiful outdoor space for about $10 per square foot if you do it yourself.
Preparing the Foundation
A solid foundation is key to a long-lasting deck. You’ll need to level the ground and set up a stable base before you start building.
Leveling the ground
Leveling the ground is key for a stable deck. Start by clearing the area of rocks, roots, and debris. Use a rake to smooth out bumps and fill in low spots. For larger areas, rent a power tiller to break up hard soil.
Next, grab a long board and level to check for high and low points. Fill dips with soil or sand, and tamp down raised spots.
To ensure proper drainage, slope the ground slightly away from your house. Aim for a drop of about 1 inch for every 8 feet. This helps water flow away from your home’s foundation. Once level, compact the soil with a plate compactor.
This step creates a firm base for your deck. Now, you’re ready to start laying the foundation for your ground-level wooden deck.
Installing concrete blocks or footings
Concrete blocks or footings form the base of your ground-level deck. For a solid foundation, lay 4-inch or 8-inch thick blocks on a bed of gravel. This setup helps with drainage and keeps your deck stable.
Use a string level to make sure the blocks are even. If your yard slopes, you might need to add 4×4 posts on frost footings for extra support. This is key if any part of the deck will be over 2 feet off the ground.
To start, dig holes for your blocks or footings. Place gravel in each hole then set the blocks on top. Check that they’re level and adjust as needed. This step is crucial for a sturdy deck that will last for years.
With a good foundation, you’ll avoid future issues like sagging or uneven boards.
Building the Deck Frame
Building the deck frame is the backbone of your project. This step involves laying beams and joists to create a sturdy base for your new outdoor space.
Laying beams and joists
Laying beams and joists form the foundation of your deck frame. Start by placing rim joists around the edge of your deck area. These outer boards should have their crown facing up for better support.
Next, install inner joists spaced 16 inches apart for wood decking or 12 inches for composite materials. Don’t use nails to attach joists. Instead, secure them with metal angles for a stronger hold.
Your deck frame needs proper support to stay level and sturdy. Use pressure-treated lumber for beams, as it resists rot and decay. Place beams on concrete blocks or footings to keep them off the ground.
This setup helps prevent moisture damage and extends your deck’s life. A solid frame is essential to a long-lasting, safe deck that you’ll enjoy for years.
Securing the frame
Securing your deck frame is crucial for a safe and sturdy structure. Start by attaching the rim joists to the outer edges of your frame. Use galvanized nails or screws to fasten these boards securely.
Next, install the inner joists, spacing them evenly according to local building codes. Don’t forget to use joist hangers for extra support.
To protect your frame from moisture damage, apply TimberTech Pro-Tac Flashing and Joist Tape. This step helps prevent rot and extends the life of your deck. Make sure all connections are tight and level before moving on.
With a solid frame in place, you’re ready to start laying your deck boards.
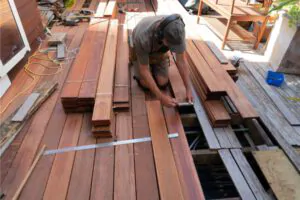
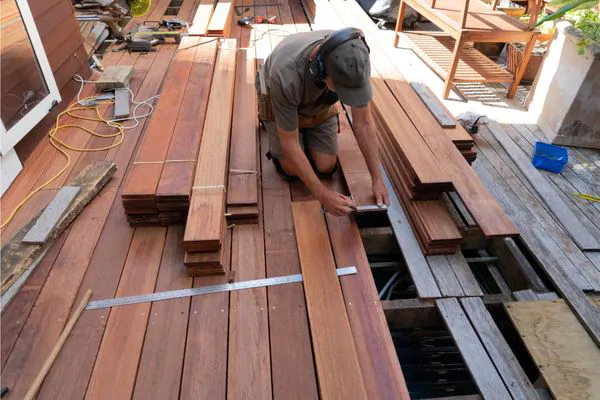
Installing the Deck Boards
Installing deck boards is a key step in building your ground-level wooden deck. You’ll need to space the boards properly for airflow and secure them firmly to the frame. This part of the job requires careful planning and the right tools to ensure a smooth, long-lasting surface.
Proper spacing for ventilation
Deck board spacing plays a key role in your deck’s health. Gaps between boards let air flow and water drain, which stops the rot. For kiln-dried wood, leave about 1/4 inch between boards.
This space helps the deck breathe and stay dry. It also allows for wood swelling in wet weather.
Smart builders use spring-loaded deck clips for easy spacing. These clips adjust on their own as the wood moves. They keep gaps even and help your deck last longer. Good airflow under the deck is just as vital.
It dries out moisture and prevents mold growth. A well-ventilated deck stays strong and looks great for years to come.
Cutting and fastening boards
Cutting deck boards needs care and the right tools. A circular saw works great for straight cuts. For a clean edge, smooth cut ends with a sander. When fastening boards, place them across the joists.
Use two screws or nails per board at each joist. This keeps the boards secure and prevents warping.
Space your boards slightly for good airflow. Stagger the seams between rows for a stronger deck. This pattern also looks nicer. Always follow local building codes when installing your deck.
They ensure your new outdoor space is safe and lasts long.
Finishing Touches
Your deck needs final touches to shine. Add steps or stairs for easy access, and apply a weatherproof coating to protect your new outdoor space.
Adding steps or stairs
Steps or stairs can make your deck more useful and safe. They let you move easily from the ground to your deck. Building them right is key. Local rules say how big steps should be.
The height of your deck sets the number of steps you need. Make sure each step is the same size for safety.
Your stairs need a strong base. Put the stringers on a solid foundation. This keeps the stairs steady over time. Use treated wood that can handle ground contact. Cut the stringers with care to fit each step.
Attach them firmly to the deck frame. Add railings if your deck is high enough. Next, let’s look at some final touches for your new deck.
Applying weatherproofing treatments
Protecting your deck from the elements is key to its long life. Apply a good sealer or stain to shield the wood from water, sun, and mold. These coatings last about two years, so mark your calendar for regular upkeep.
Pick a product that repels water and fights mildew growth. Before you start, clean the deck well and let it dry fully. Then, use a brush or roller to put on an even coat. Don’t forget the ends and gaps between boards.
These spots soak up moisture fast.
For best results, treat your deck on a dry day when temps are mild. Avoid direct sun, as it can dry the product too fast. Two thin coats often work better than one thick layer. Let each coat dry before adding the next.
With proper care, your deck will stay strong and look great for years to come.
Conclusion
Building a ground-level wooden deck can transform your outdoor space. With the right planning and tools, you can create a beautiful deck in just one day. This guide has walked you through each step, from choosing materials to adding finishing touches.
Your new deck will provide a perfect spot for relaxing, entertaining, and enjoying the outdoors. Get ready to make the most of your backyard with your very own ground-level wooden deck!
FAQs
1. What is a ground-level wooden deck?
A ground-level wooden deck, also called a platform deck, is a low-lying outdoor structure built close to the ground. It doesn’t need railings or stairs, making it easy to install and a great choice for those looking to build a simple patio-like area.
2. Do I need a permit to build a ground-level deck?
The need for a permit depends on your local codes and regulations. Many areas don’t require a permit for decks under 200 square feet and less than 30 inches high. But, it’s always best to check with your local building department before starting your project.
3. What materials should I use for my ground-level deck?
Pressure-treated wood is a popular choice for deck construction due to its durability and resistance to rot. Composite decking material, like Trex, is another option that’s long-lasting and low-maintenance. Your choice may depend on your budget and the look you want.
4. How do I prepare the ground for my deck?
Start by leveling out the ground where you plan to build your deck. Remove grass and roots, then add a layer of gravel for better drainage. Use concrete blocks or deck blocks to provide a stable foundation. Make sure the surface is even to support your deck properly.
5. Can I build a deck directly on the ground?
While it’s possible to build a deck directly on the ground, it’s not recommended. Proximity to the ground can lead to moisture problems, causing wood to rot or mold to grow. It’s better to use concrete blocks or posts to raise the deck slightly, allowing for air circulation beneath.
6. How do I install the decking boards?
To install your decking, lay out your joists according to your deck plan. Space them evenly, usually 16 inches apart. Then, start laying your decking boards perpendicular to the joists. Use a circular saw to cut boards to size, and secure them with deck screws. Leave small gaps between boards for water drainage and wood expansion.